Welcome to Apache OFBiz! A powerful top level Apache software project. OFBiz is an Enterprise Resource Planning (ERP) System written in Java and houses a large set of libraries, entities, services and features to run all aspects of your business.
This manual will describe all aspects of this powerful ERP system. The manual starts with the basics of what OFBiz is and how it works, and describes high level concepts like the entity engine, service engine, widget system and so on. In addition the manual explains the core application of this framework like the Party Manager, Order Manager, Accounting system, and others.
If you wish to contribute to OFBiz and help make it better, you may wish to read the "Apache OFBiz Developer Manual" for a deeper understanding of the architectural concepts of the framework.
It is hard to define OFBiz because it offers many different solutions targeted at different levels of interests (users, developers, business owners). At a low level it may considered a web framework, at another level, it may considered a full fledged ERP system, and yet it can also be considered a business automation suite.
Perhaps to better understand what OFBiz is, it may be necessary to understand its main parts and the purpose that each part plays. Thus the main parts or sub-systems are summarized below.
The lowest or most foundational part of Apache OFBiz is a classical web MVC (Model View Controller) framework. This part of the system is designed for basic routing of web requests and may be considered as the infrastructure or plumbing where everything is wired together.
The entity engine allows OFBiz users to define entities, data, and queries in a database-independent domain specific language (DSL) based on XML. Thus, without learning any SQL users can create and interact with databases in a platform-independent manner and Apache OFBiz would make the translations under the hood to each database system.
Apache OFBiz is designed specifically around a Service Oriented Architecture (SOA). Services are units of business logic that take a set of input values and produces a set of output values.
Services are programming-language-independent. It does not matter whether a service is implemented using Java, Groovy, Jython, or something else because services are an abstraction away from the underlying technology. This provides maximum flexibility for designing business logic without worrying about interoperability between different languages.
Whether the output is HTML, CSV, PDF, or something else, Apache OFBiz provides a system for creating user interface that is independent of the actual implementation. This makes it possible to publish the same widget to HTML, PDF, CSV or some other output format.
However, the widget system allows users, if needed, to drop down to any platform-specific code and mix it with widget designs, thus providing a mix between ease of use, platform independence and customizability.
Apache OFBiz is heavily inspired by a book called the "The Data Model Resource Book". This book provides a "A Library of Universal Data Models for All Enterprises". These models cover things like parties, orders, invoices, payments, general ledgers, quotes and much more.
By using OFBiz, adopters start with a full pre-designed data model that covers common and universal business requirements. Hundreds of entities are defined which save many hours of thinking, designing, and testing such models.
It is important to note that the data model library does not only cover entities, but also the data that comes with these entities. Data is further categorized by function (seed, demo, etc …)
Having a rich and powerful data model is not very useful on its own without services that apply business logic on this data model. That is where the services defined in Apache OFBiz come into play.
OFBiz provides, out-of-the-box, thousands of services to create, retrieve, update, delete, search, and do many other operations on the data model.
The core applications in Apache OFBiz are web applications that serve common business needs found in most enterprises such as accounting, order management, party management and so on.
These core applications are built on top of the data model and service library earlier described. The core applications are further described in the relevant section.
OFBiz extends any basic functionality through plugins. Plugins are very similar to the core applications in design and structure, but are not shipped with OFBiz by default. Thus to install a plugin a user must add it to the framework first.
there are two supports for OFbiz documentation, the wiki and some mains documents (in pdf and html format)
The OFBiz documents are generated from a number of Asciidoc files. In general the files are stored on each component in the 'src/docs/asciidoc' directories.
The general main documents include all files from component.
The manuals and guidelines documents are located in docs/asciidoc directories, and REAME.adoc is in root directory.
Help link in the OFBiz user interface, are link to the user-manual generated by buildbot process from Apache OFBiz community. It’s possible to change a property in OFBiz to have link to your own generation.
For details about asciidoc rules used in Apache OFBiz have a look to Documentation Guidelines
All main files of each component are included in user-manual.adoc
All main files of each component are included in developer-manual.adoc except for webtools which is included in user-manual
For the main files of the plugin components, there are two ways to read them.
On the one hand, the plugin documentation generation process generates one document per plugin, so that you can see the list of documents in the pluginsdoc directory and thus read each of them;
On the other hand, each plugin master file is included in the plugin chapter of the user manual or developer manual, depending on whether the plugin is "technical" or "functional".
Wiki is the second way to contribute to the documentation. Detail on how to Help for providing help content is on the wiki
Most of wiki page has been or will be migrated to the asciidoc pages, but, as wiki is more easier to be update (update existing page or create new one) the two system will continue to exist and live.
Documentation Guidelines is the first doc to read to be able to contribute to documentation and/or help.
If you are looking for asciidoc files format examples, please look at the following files:
If you would like to create a new help for a certain screen, you need to do the following:
Currently documentation is only in English (except for 3 or 4 files, not included).
In near future, there will be a solution to be able to have documentation/help in multiple languages, a jira (OFBIZ-12030) is open of that.
The switching between locale will be completely automatic (depending on OFBiz user local)
To quickly install and fire-up OFBiz, please follow the below instructions from the command line at the OFBiz top level directory (folder).
MS Windows: init-gradle-wrapper
"Powershell is not recognized as an internal or external command, operable program or batch file"
follow the advice there: https://s.apache.org/vdcv8. If you want more details see: https://s.apache.org/urnju
If you wonder where are stored the PowerShell Executables, here are the answers: https://s.apache.org/w5dye
Unix-like OS: ./gradle/init-gradle-wrapper.sh
Note: Depending on your Internet connection speed it might take a long time for this step to complete if you are using OFBiz for the first time as it needs to download all dependencies. So please be patient!
MS Windows: gradlew cleanAll loadAll
Unix-like OS: ./gradlew cleanAll loadAll
MS Windows: gradlew ofbiz
Unix-like OS: ./gradlew ofbiz
Note: Ignore the % progress indicator because this task does not end as long as OFBiz is running.
If you want to set and use Docker, here is the documentation
You can log in with the user admin and password ofbiz.
The OFBiz Setup application is supporting for immediate setup your organization. For example, Product Store, WebSite , Facility , product catalog, category , product, and etc. and then be able to create orders from data that is created.
| For manual setup instructions, please see the Business Setup Guide on the wiki. |
If you are the company and also want to use OFBiz for running your business then you easily be able to setting your information for start running the system quickly via The OFBiz Setup Application.
| TO CHECK add link to Readme and better information between demo data and seed |
For instructions to run and load data to have OFBiz ready to be used, please read the README documentation.
For having OFBiz ready to be setup, it’s needed to load data from reader seed and seed-initial
The main page on OFBiz Setup application including 2 sections, following this:
This section shows list of organizations which store in the system. You be able to edit an information of your orgainzation via click setup then it will go to view profile screen, you will see other tab button including Facility, Product Store, Web Site, First Customer, and First Product where you would like to edit an information.
When you created an information of your orgainzation and also created product. And the last step is click "Set to complete" button.
This section provides a form for create a new an organization(the first step of setup organization) and also setup the "Billing (AP) Address" , "Payment (AR) Address", "General Correspondence Address", any telephone numbers, and email addresses you want for your Company.
The Edit Facility screen is used to manage a warehouse, a store with related inventory.
Not all the fields on the facility can be updated.
For example Facility Id cannot be updated. If these fields need to be amended then the facility will need to be removed and then re-created.
The Product Store screen is used to manage a store with has all the information needed to sell products.
For example shippings ,a series of catalogs, which are composed of product categories and products, and also used to configure the payment processing settings , fulfillment, notification, promotions, payment processing, and tax calculation policies , and etc.
Not all the fields on the Product Store can be updated.
For example Product Store Id cannot be updated. If these fields need to be amended then the Product Store will need to be removed and then re-created.
The WebSite screen is used to manage the details of a WebSite.
The WebSite record is used to configure which Product Store to use for your site that references it.
The First Customer screen provides
- create/edit the first customer of your organization
- and also setup the "Shipping Destination Address" , "General Correspondence Address", any telephone numbers, and email addresses you want for your first customer.
After the first customer is created the profile and contact information screen will be displayed
It provides an overview on Catalog, Category, and Product which is the first one of your organization.
You will be able to create/edit Catalog, Category, and Product for your organization and also be able to create order by that product.
The Edit First Product Category screen is used to manage the first category with related the first catalog.
The Edit First Product screen is used to manage the first product with related the first catalog and the first category.
This screen shows details of an individual profile.
It displays specific information regarding the contact and profile information. The lower part of the screen shows the contact information details indicating the address, telephone number, or email used to communicate with your organization.
Most businesses share universal needs. They require accounting functionality, managing customers, placing orders, book-keeping, invoicing and so on.
OFBiz is designed so that such basic universal business needs are available through a set of core business applications. These applications all share a unified data-model with a set of unified services to implement this functionality.
This section of the manual will describe each core business application starting with a high level overview of design and purpose down to the details of how to achieve common tasks.
The Party Manager application is used to manage the parties, i.e any legal entity your company has to deal with.
A party can be a person or a company (or a group of parties).
Party application can be use to manage:
This application is used to manage profile, contact information, relationship, role, communication, classification, …
The 'Find Party' is the default screen for the Party Manager application.
It is used to locate existing parties.
Various search criteria can be used, either based on the general party data like name role and type but also on the postal address, telephone (Telecom) and other like email address.
If the find button is pressed, a list is presented containing several columns.
The first column shows the Party ID. This is a string that uniquely identifies the Party in the system.
The second column shows the Party logins.
This is the string the user enters when logging into the system.
A single Party can have more than one login. In this case the "(many)" string is showed in place of the login string. The complete list of user logins can still be seen in the Party details screen. If a Party has no user login associated the string "(none)" is shown.
In the "Main Roletype" column the role is listed which is a child of the "Main role"" roletype. It is currently set to "Organisation" and "SFA Role". The later to be prepared to use he party in he SFA component. See the marketing application for more information
This screen can be a starting point for Order management (view existing, create a new one, …).
For each Parties listed, there are links to Order management action.
Before taking the order, you might want to update the party’s information: is the address and phone number current, how will they be paying for the order (credit card number current? EFT information correct?), or perhaps review their ordering history (are there an excessive number of returns?). To look at their file, either click on the [Party ID] or the [Details] link.
If the contact from your customer is specifically about a previous order, you can click on the [Orders] link which will take you to a table of all their previous orders.
OFBiz needs to have at least on main company set up that will represent the main business or organization.
If you have installed OFBiz with the demo data then the main company already exists.
If you have installed OFBiz without the demo data then it will not exist so you will need to create it.
This is is done in Party Manager.
| Party Manager is the application where we create all the entities (companies, people, groups, departments) that we deal with in the course of doing business. |
This tutorial is quite simple, only 4 step.
This process is running automatically every day in Apache OFBiz demo (trunk) as a GUI process test.
The associated video (showing all the actions described in this tutorial) can be visualize at How to Create the main Company
You are now on profile page.
Next we need to enter some contact details. Find the "Contact Information" section (box)
The address is added - but - there is still some missing setup.
We need to include a purpose (or use) for the address.
The address purpose is be updated.
We now need to add a specific role to this party group to let OFBiz know that is an organization that will have an accounting setup.
The internal organization role will be added to our new Party Group.
Now this is done we can begin the Accounting setup.
An agreement is a way of recording a business arrangement or contract that your business makes with other companies or individuals. For more details have a look to Agreements management in accounting component.
| Examples: Customer or Supplier payment terms (eg.30 days to pay); Discounts (e.g products or volume); Commissions; Customer Contracts (agreement to sell x number of widgets for y price, or sell at y price for a certain time frame) |
Person is a human being as distinguished from a party group which is an organization. Human beings and organizations have different attributes i.e. People have first and last names while groups have group names. Both person and party group are types of parties and share information and processes common to parties.
Security GroupA security group is a collection (or a set) of application privileges that can be assigned to a user login id. A user can be assigned to multiple security groups
| Example: FULLADMIN; BIZADMIN; ECOMMERCE_CUSTOMER. |
Role of a party that something if purchased from
Role of a party that sells something with the system
The Catalog Manager creates or provides access to a variety of information. Whether Products, Catalogs, or Categories, this screen offers search tools and links to get you to the type of information you need or are working with quickly and accurately.
The Catalog Manager application is used to manage the products, all what is purchase, sale, build, used, … by the company. A product can be physical or digital.
With catalog application, you can manage all data associated with Product : category, catalog, price, id, ….
Down the left hand column are 4 sections:
| You can click on the colored '_' to close a section; later, click on the colored '[]' to reopen the section. |
Each of those sections are discussed below before we begin to explore the Catalog Administration Main Page.
Navigation Panel The Left-hand Navigation Panel is visible even when working under the other tabs.
The content displayed will vary according to what choices you have made.
This document is arranged to walk you through the Navigation Panel search tools (Search Products, Browse Catalogs, Browse Categories, and Category Products) and links first.
As you come to the desired Edit or Creation window, jump in this document to the associated 'Edit' discussion.
Some symbols used as shortcuts Brackets [] Application links as found on the screens are represented in this document with brackets around them like [this]. When you see a bracketed item, you can know we are referring to a link or key or 'button' which will initiate the indicated action.
Greater than symbols >> The single (>) or double (>>) greater than symbols can be read as 'takes you to' or 'leads to' or 'results in.' These are sometimes used in this document to indicate that from this screen, if you click on the [Bracketed Link], you will be taken to Next Process.
Within the pop-up calendars, however, the (>>) jumps you ahead one year and the (<<) jumps you back a year.
An asterisk * marks those items which must be completed on a screen before the desired action can occur.
A product catalog is used to group many product categories together and forms an intermediate step in the organization between products, categories, and stores.
The product catalog can be used to define a common look and feel for all categories in this catalog and specify the way different categories will behave.
For example, it is very useful for stores which sell products from different manufacturer or completely different product types that require differing presentations to the customer.
Although the process sequence through the tabs discussed below does not correspond with the tab layout within the Catalog Manager, the progression of the steps is intentional.
All of these details are handled within the Catalog Manager.
To follow this topic, click on the 'Catalog Detail List' in the left-hand panel under the 'Browse Catalogs' section.
Then click on any catalog in the table of current catalogs presented in the main screen.
You will see the top-level editing screen for that catalog.
Along the top of the working screen are four sub-tabs: Catalog, Stores, Parties and Catalogs.
Each of those are discussed as a topic below.
The main Catalog tab for a product catalog is mostly for establishing the look and feel.
Each catalog can have its own style sheet (CSS), its own logo, and its own content repository (the content path prefix) and templates prefix (where its freemarker templates are located).
The 'Stores' tab shows a list of Stores that this Catalog is currently featured in.
| Stores and Catalogs do not have a one-to-one relationship: the same Store can feature multiple Catalogs, and the same Catalog could be featured in many Stores. |
Here you identify which Party is responsible for or assigned to work with the specific Catalog selected.
The Party’s Role is assigned or identified and, if appropriate, a start and/or finish date for the assignment can be specified.
The 'categories' tab shows the different product categories and their roles for this catalog. Specifically:
In the left-hand panel is a section labeled 'Browse Categories.' You can click on one of the -indented- categories to begin editing it directly, or click on the [Choose Top Category] link to view a list of links to all Parent categories.
The catalog administration main page has several small menus for finding catalogs, categories, or products.
The first three menus allow you to edit catalogs, categories, or products by their respective IDs, or create new catalogs, categories, or products.
The last one allows you to look for a product using an ID other than its product ID, such as upc or isbn number (see below.)
Under these menus are two more links.
Auto create keywords will create keywords for all of the products identified with the current Catalog.
The keywords are based on product descriptions and are used for searching for products.
Fast load catalog into cache will load all products and product categories into the cache; this is good for improved application performance.
| only basic product and category information from the first Product and Category tabs is loaded, so additional information such as content, associations, and pricing will still have to be retrieved from the database and cached later by the applications. |
To Sell and to Differentiate Products, Features are characteristics used to sell and to differentiate products.
The Apache OFBiz catalog manager allows you to define any feature set you wish for your products.
Typical features include size and color.
In Apache OFBiz, features are associated, or applied, to products as Standard Features, Selectable Features, or Distinguishing Features.
Standard features are features which are associated with every instance of a product.
An example might be the brand name of a product — all instances of the product share the same brand name.
Selectable features are features which the customer selects one from many available choices.
For example, a shirt may be available in White, Blue, Green, Yellow, Pink.
These colors would be selectable features of the variant product shirt, and the customer would be prompted to choose a color.
Each color, though, would be a standard feature of the physical product.
Thus, White would be a selectable feature of the virtual product 'shirt' but a standard feature of 'white shirt.'
Distinguishing features are features which distinguish one product from another and are used to show the customer which item she chose.
These screens are for creating and maintaining product features, which are features or characteristics that are available for products.
Here you will define what features can be available for products.
Later, when working with the products, you will have a chance to define what features a particular product may have.
Notice the sub-tabs for Feature Categories and Feature Groups.
These are both used to help you organize your product features.
Each feature can only belong to one category but as many groups as you need.
For example, you can have :
Then, you can have :
Once you have created a feature category, you can click on it to add features to it.
There is a link [Create new feature] which takes you to a screen to create a new product feature.
Below this link is a list of product features already in this category.
Important fields for product features are listed below.
Click on [Feature Categories] (this is the default screen when you clicked on 'Features' above), and you will see a menu for editing a particular feature, if you remember its feature ID.
(If not, you can edit it from the feature categories below.) Next, you will see a list of feature categories and their parent categories.
The categories' ID codes are highlighted, and you can click on one to go to the feature category.
At the very bottom is a menu for creating a new feature category.
Here, you would enter the new feature category’s name and specify a parent category for it (if it has one.) The category ID is automatically created for you.
Click on [Feature Groups] and you will see a screen showing a list of available feature groups, and an option to create a new feature group at the bottom.
Click on the ID of the feature group, and you will be taken to a screen which shows all the features in this group (if there are any) and a menu to add more features to this group.
Like feature categories, the IDs of feature groups are automatically created.
You can associate feature categories or feature groups to a Product Category.
Buy doing this will provide web store customer feature based product search ability.
If customers choose to search within a given category and that category has features associated with it then they will be displayed as selectable filtering options (based on the associated product features) on the search form.
Promotions are similar to Price Rules (see Price Rules, below) but are used to record special promotional offers which apply to the entire order, rather than prices for a particular product.
For example, the promotional manager can be used to set up rules to give customers a percentage discount if they purchase a minimum quantity, or to create a coupon code.
| Promotions are tied to specific stores, whereas price rules are applicable to all products (although you can specify the website, product catalog, or category for which a price rule is applicable). |
The opening screen lists all promotions which are currently available and a link for creating additional promotions;
click on one to go to a promotion.
You will also see a series of four tabs: [Promo], [Rules], [Stores] and [Codes].
At the top is general information about this promotion.
Each promotion has an ID, a name and a longer descriptive text, which are shown to customers.
If no text is entered, Apache OFBiz will automatically generate text for you.
Rules for promotions are used to determine what actions should be taken in the promotion.
Each promotion can have multiple rules, and each rule can have multiple conditions and actions.
If a promotion had multiple rules, they would all be checked in sequence, and the rules whose conditions were true will be activated. This is especially helpful for complicated promotions that have multiple offers.
The stores tab shows a list of product stores in which this promotion is active.
You can add additional stores here or delete them.
The codes tab is used to associate codes for a promotion, similar to coupon codes.
A product store has all the information needed to sell products.
It is composed of a series of catalogs, which are composed of product categories and products.
Each store can have its own shipping, fulfillment, notification, promotions, payment processing, and tax calculation policies.
A product store can point to several different websites, allowing the same products to be sold on multiple hosted sites or domains.
Alternatively, multiple stores, each with their own website, can be set up to allow different pricing and fulfillment procedures for, say, different countries or different market segments (wholesale versus retail.)
The 'Stores' tab in the catalog manager as used to define all the properties of a working store, is a group of products sold together under the same policies.
Stores greatly improve the flexibility of Apache OFBiz applications.
It is possible for a company to set up multiple stores, each with its warehouses, fulfillment policies, currencies, languages, promotions, and look-and-feel.
These stores can be web-based b2b or consumer ecommerce stores or for internal order entry.
They could even be in different countries with different shipping and taxation rules.
When you click on 'Stores,' you will see a list of product stores that have been defined.
Click on one and you will see several tabs for administering different aspects of that store. Some of those aspects are discussed below.
This very complete screen provides entry for all of the myriad choices available which define the store and establish parameters.
Defines parties with specific roles for this store.
For an employee to be able to take orders using the internal order manager application, he must be defined as a 'Sales Representative' here.
Restrictions are enforced through the Party Manager - SecurityGroupsList which grants rights according to party roles.
Shows a list of active promotions for this store.
Catalogs which are available for the current store and the sequence in which they are to be shown to the user in a navigation menu.
Websites which are related to this store.
This is directly used to link a store to a web application.
Each web application has a configuration file called web.xml, and it is defined to reference a particular web site.
The web site in turn is defined to relate to a product store.
Thus, by setting a store on a web site, it becomes 'live' on that web application.
| It is possible for a web application to have more than one store associated with it, as long as the application knows how to use the correct one. |
This page shows the shipping options available to store customers.
A list of shipping options and their pricing is shown.
Click on View for a shipping option shows all the settings for this shipping option.
At this point, this tab can only view shipping options available and can not be used to define them.
his is used to set up payment processing for the store.
The payment processing interfaces are defined as Apache OFBiz services.
Each payment method will have a series of service types available to it, such as for authorizing, capturing, and refunding payment.
This page links the payment types and the services together by their purpose.
Thus, one service would be used for credit card authorizations, another for credit card capture, and so forth
This defines emails which the store would send to customers.
The actual email services are either mounted in the controller, such as the order confirmation email, or from scheduled services, such as back order notifications.
This page defines where the template for the email is located on the file system, the addresses and subject of each email, and a content type (which can be left blank).
This page is for adding surveys to the store.
Surveys can be associated with certain events or with products and categories.
Allows certain keywords to be ascendant at this store for a particular time period.
Identifies the Sales or Market Segments targeted for this Store.
The actual assignment is made under the Marketing tab > Segment sub-tab.
Here under the Product Store you will see a summary table of those assignments along with links to make any additions or changes.
The Image Management module manages many kind of image what user want.
There are various functions including 'Gallery', 'Upload', 'Approved', 'Manage' etc.
Go to Catalog Component > tab Image Management.
There are three security groups related in the Image Management including 'IMAGEADMIN', 'IMAGEAPPROVE' and ' IMAGEUPLOAD'.
Click partyId into party’s screen already present.
Select the submenu 'Role(s)' to add the role to party
There is Add To Role screenlet, select role 'Image Approver'(on the combobox role type Id) then click 'add' button.
Gallery shows all images which have approved.
| Everybody can access Gallery function. |
In this function, you can upload image files into system.
You can upload many image files up to 10 files.
| You must have Image Management Upload permission for access Upload function. |
In this function, you can see the images which have been approved for 14 days recently.
| You must have Image Management Admin permission for access this function. |
In this function, you can set the status of each image including 'Approve', 'Pending' and 'Rejected'.
| You must have Image Management Admin permission for access this function. |
The images will be approved if all image administrators approved them.
But if only one person rejects an image then that image will be rejected.
The Rejected function shows the images which have rejected.
| You must have Image Management Admin permission for access this function. |
You can edit image such as add frame, crop image etc.
You can also add caption, sort order, enable image and choose thumbnail in this function.
| You must have Image Management Admin permission for access this function. |
In Frame function, you can merge your image with the frame image (transparent image file e.g. PNG type) together.
The frame image should be larger than selected image.
You can crop any images in this function.
You can rotate images in this function.
In this function, you can replace the selected image with other image.
The image which you want to replace must be approved first.
The Facility Manager is used to manage a warehouse, a store with related inventory.
All operations relating to stock:
For details about Sale Return look at Return Process Overview
| What the customer needs from you at this point are three pieces of information to include on the outside of the package he is returning: |
They should keep this information available for themselves in case they need to call back to check on the status of their return.
These are goods are held for sale to customers. Inventory is also referred to a Stock. Inventory can be items that are bought for resale or it can be products that are manufactured and sold to the customer.
These are goods are held for sale to customers. Stock is also referred to as Inventory. Stock can be items that are bought for resale or it can be products that are manufactured and sold to the customer.
The order manager allows you to enter and maintain orders, quotes, requests and report on them.
It allow to manage purchase and sales orders from the creation and approval to the goods packing and shipping.
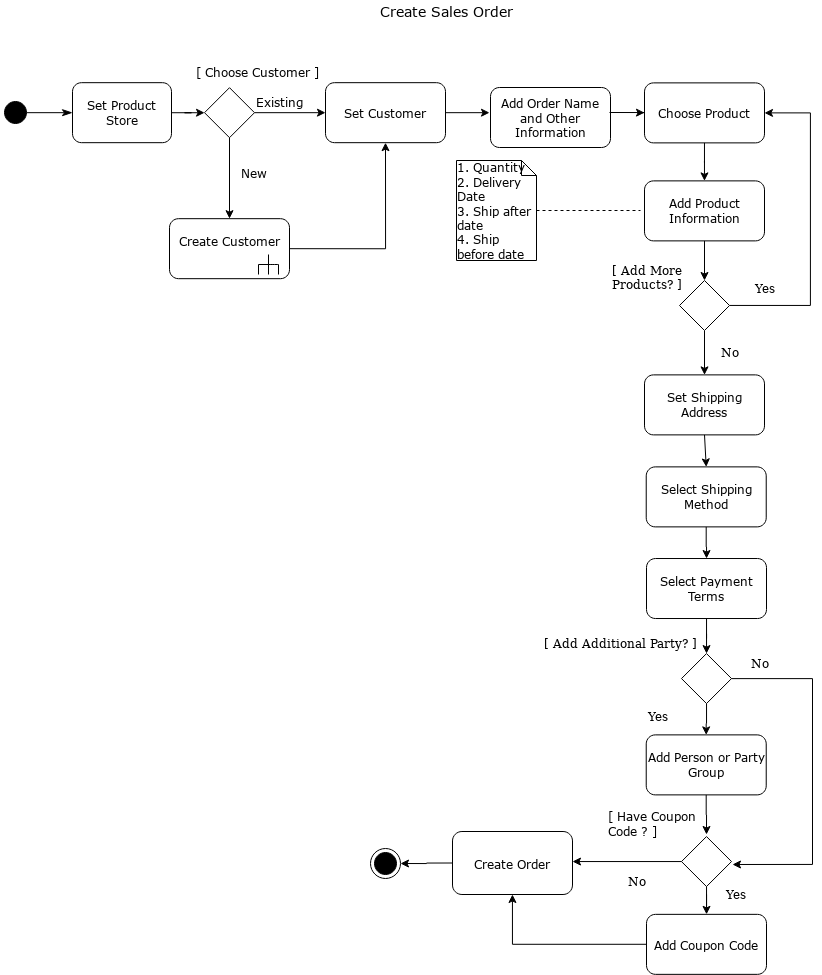
A sales order is an agreement between a business association and a customer concerning the delivery of products or provision of services. This process involves order capturing, order status management, payment terms and method setup etc.
A customer can place an order from the storefront or a customer service representative (CSR) can place the order on behalf of a customer from the back end.
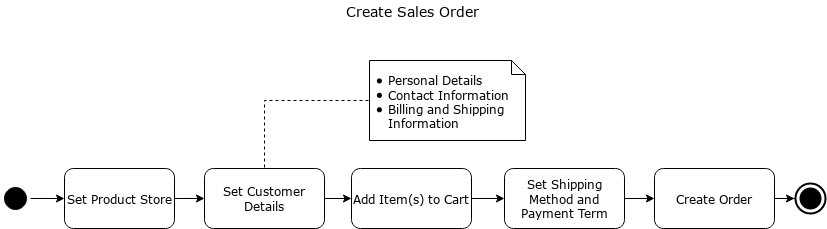
A Sales Order from the customer notifies the business of customer wants. It tells the business who is the customer, what are the products or services ordered, what is the payment term and method, what are the billing and shipping addresses, any special instructions for delivery, order priority etc.
Sales Order document is created in the system with a unique reference number that comes in handy for better customer service afterward. It enables a business to offer the customer to have a choice to change ordered items. The customer also gets the details of the order which can be accessed through his profile on the storefront (eCommerce front) at any time if registered or else can use the order reference number while contacting the business for reporting any issues.
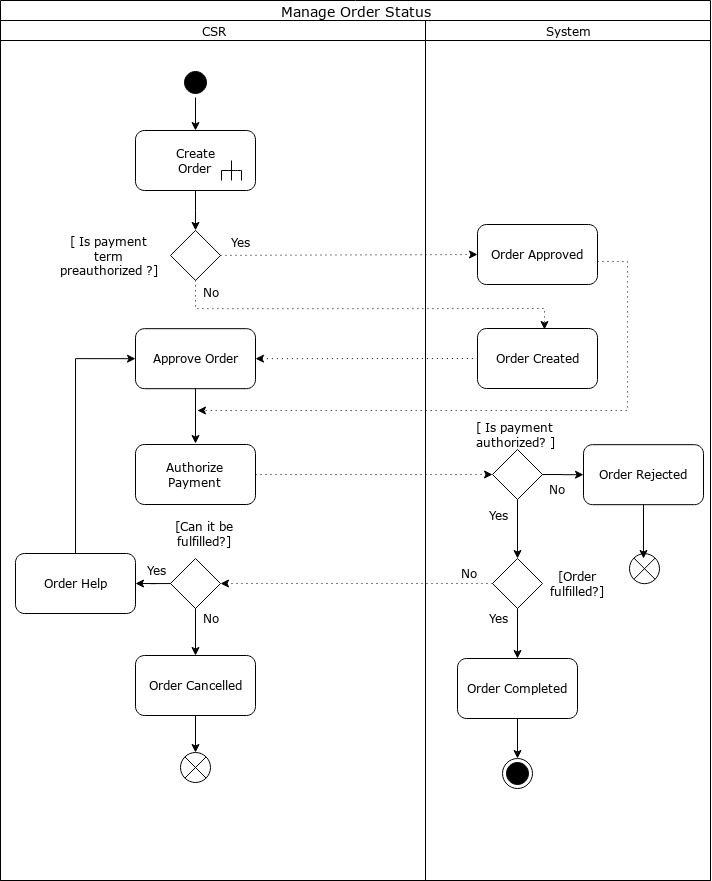
Order status transitions help business to filter orders based on status (Created, Approved, Rejected, Completed etc.) Current order status tells the state of order in the system at any given time which is used effectively by CSRs while communicating with customers over the phone.
Order payment terms and method tells the business how the order payment is going to be processed. It helps in timely fulfillment of orders, which is key to success for any business. Same is with billing and shipping information on the order, it tells the business which address to be used for invoicing and which one for shipping. Having an effective order capturing process helps to engage your customers.
The Accounting manager keeps track of financial charges, credit card processes, and receipts of payment. The link from the Order Manager to the Accounting Manager is the Invoice Number
A customer always provide shipping method details to let the business know about his shipping preference to ship the order and in other ends, CSR always captures shipping method along with special instructions for delivery.
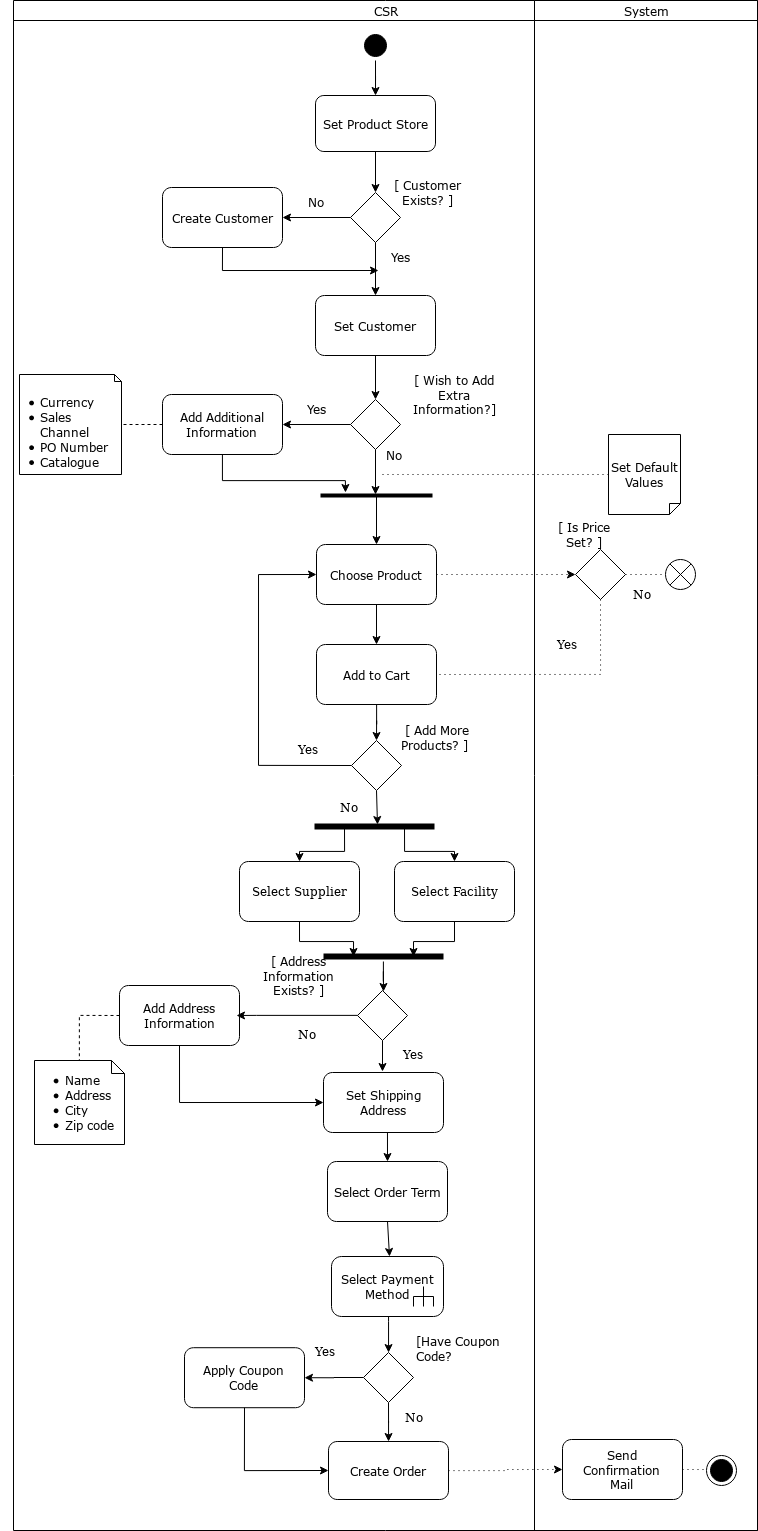
CSR creates a sales order for the customer from the backend as per the given information like personal details, contact information, billing and shipping information, and payment terms and methods. A customer can create a sales order from the storefront (ecommerce) as well.
An Order Status is an easy visual indication to alert business about the orders requiring actions or not.
Order status is indicated on Order View screen on top of main part and just below there are history of change.
An Order can have the following status:
Status change on actions on order (ex: payment is received) or on direct action button on Order View screen on main part in top menu bar.
f you have an approval process, you will want to check over the details to confirm that the shipping information is complete and accurate, that the billing details are acceptable and that the requested shipping dates (if specified) are within your company’s capabilities.
When all is ok click on the [Approve Order] link in Order View
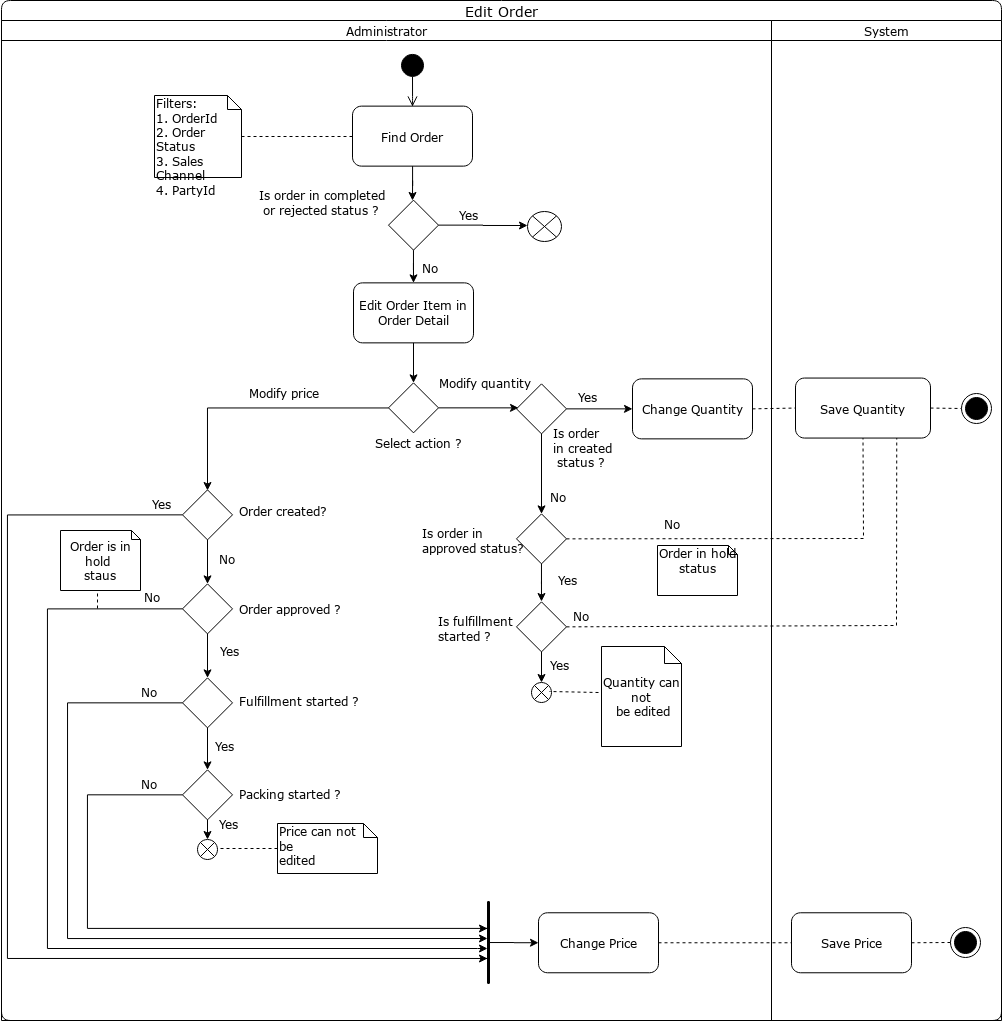
A [CSR] can edit or update in order to make changes in it based on customer requests or can add notes for handling.
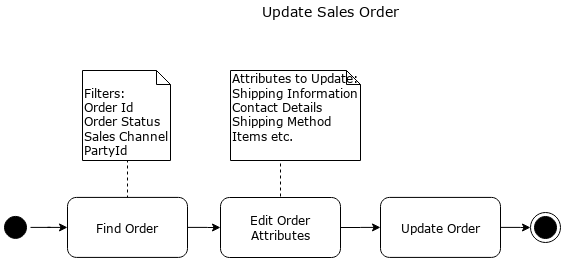
All informations on order are modified, but depending on order status or packing / shipping started.
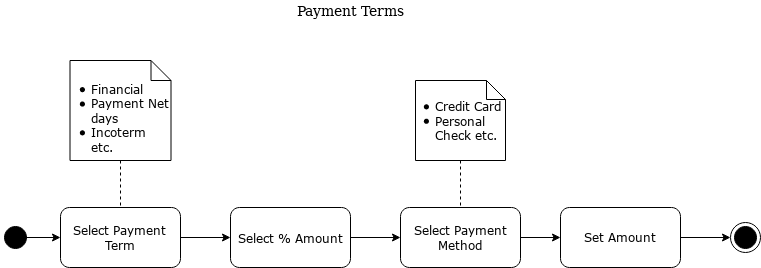
Payment Terms are conditions agreed between business and customers for the payment of invoices.
Selecting Payment Terms and Methods are key things in fulfillment of any order process.
Depending on payment method process is not exactly the same.

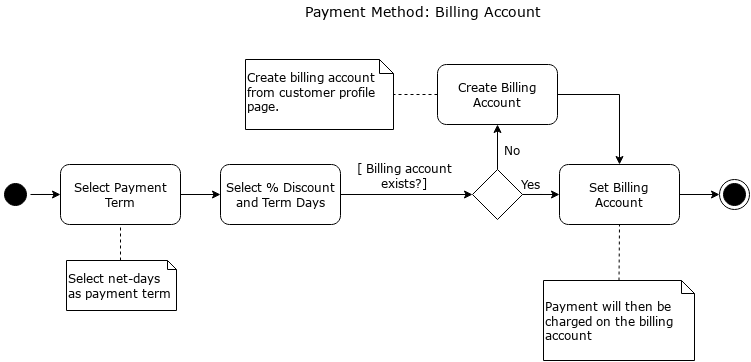
For information about Billing Account look at Accounting - Billing Accounts
Sales and Purchase management are done on the same screen, so depending on what you want, don’t forget to select the correct Order Type.
Upon opening the Order Manager, your first screen will be a short sale "dashboard of the day" with: * the new sales orders (enter today) * the top 5 of the product sales today
This screen is a portal page, so in some case it’s possible to choose which portlet to put.
On the first part, only order with status and type selected in the screen appears. For example, if you work on purchase department, on Order List screen, if you select purchase type and only Approved status, on the main screen you will will see only purchase order created today and already in approved status.
Even if this screen is useful, it’s also a example a developer can personalize to give orders to follow in your business situation.
The focus of this screen is order status
retrieve all orders for one type and a selection of status.
It lists all the current orders in need of processing. You should spot the one prepared above in the list; click on the Order Number to proceeed. If too many orders are listed in the first screen (List Orders), unclick the 'Approved' checkbox and click on [Submit]. If still too many, unclick either the 'Created' or the 'Processing' status checkbox and try again.
Using the check boxes and the [Submit] link, you will bring up a list of all orders in any category selected.
Order list give you main information on parties associated to the order and a link to the order details.
To narrow your search, use the Find Orders tab. This brings up a complete search screen which will take any possible parameters to find the one you want to work with.
This screen brings up a complete search screen which will take any possible parameters.
Enter information about the order and click on [Find].
Existing Orders are listed and you can complete it or modify it, if that is what the customer is calling for.
Or, reduce the number or Orders presented by entering parameters in the search screen, above (you may need to click [Show Lookup Fields] and trying to find what you want more specifically.
There is a direct action button on the top left of the list, to directly change status
In the Order list, there will be a link from that order to the PartyID;
click on the ID and you are in the Party Manager > Profile page for the customer.
On the profile page, one of the links there is [New Order] which takes you back to the initial Order Entry screen, discussed below.
If specifics about the order are not known, you might prefer to find it through the Party. In that case, select [Lookup Party]. The Party Manager can link you back to previous orders.
This screen allow not only to view an order but also to change it
Note the link to [PDF]. This will create a PDF formatted document which can be used internally for paper processing the order or sent to the customer as an attachment or hard copy to confirm the order. The customer should be told that the Order Number should be referenced in any correspondence regarding the order.
Status and General Info
Notice the Status History? This tells you when the order was placed, when it was approved and, later, where it is at in the shipping process.
The section labeled 'Created by' will give you the login ID of the person taking or making the order. This is who you need to talk with if there are any problems in the original order. Remember, it could be your customer service rep or it could be the customer herself if the order came in through ecommerce.
Payment Information Section
This section will reflect the type of payment selected by the customer. If Debit or Credit Card, the card number last 4 digits will show; if EFT (Electronic Funds Transfer - electronic checking withdrawal), the bank account number will appear.
Shipment of the order against customer payment by check or money order will appear as shown below. It might be your practice to withhold shipment until payment is received. When it arrives, pull up the order and click on [Receive Payment].
Order Items Section
All the products, whether ordered or being sent as promos, are listed here. Note the many details shown in this section.
Actions Section
[Quick Ship Entire Order] is a powerful link built on a great many assumptions that everything needful to complete the order is in place, including financial arrangements, inventory, manpower to fulfill the order, etc. This powerful action will by-pass many of the normal processing screens, accomplishing most steps behind the scenes. See the topic QuickShip Fulfillment Path for more details
Shipment Information Section
Steps for shipping the order start here.
Remember there are two different uses of the word 'Splitting' and you need to know which meaning is being used. When the phrase 'Splitting Preferences' is used here we mean: Does the customer want a part of his order to be shipped as soon as any portion is available, allowing the delayed balance to follow at a later date? If splitting is not desired, all elements of the order must be gathered together for a unified shipment.
In this order as shown, if you were to click on the link [Allow Split], you would reverse the customer’s original choice to wait for all items in one order. Do NOT select that link unless the customer has informed you of a change in her former preference!
When the next item is considered, 'Ship Group,' we would be looking at a Split Order with part of it going to one destination and the other part to another if there were two Ship Groups indicated. As the order in this example shows only one Ship Group, you can know that all items are destined for the same location.
The [Pack Shipment For Ship Group] button Initiates the preparation of packages for shipping the order under the Facility Manager. This is just one of many screens where this step can be triggered.
There are several approaches to having the products Picked and Packed in the system. One method is to open the Facility Manager, click on the Facilities tab, select your Facility, then click on the Picking tab.
After identifying and submitting orders that need Picking to the floor, you move over to the Packing tab. This one is more individualized; you can see the screen shot below. You must enter the Order number, then enter the Product ID for each item as it is accepted.
A much easier method is right there in the Order Manager. Pull up the Order and look under Shipment Information. See the link labeled Pack Shipment For Ship Group [00001]? Click on that and you will see the second screen below.
The link [New Shipment for Ship Group ] will bring up a working screen in the Facility Manager to allow you to begin the Warehouse Path, discussed below.
QuickShip presumes several things:
Essentially, QuickShip allows OFBiz to bypass all of the procedures for identifying, picking, packing, billing and shipping so that the package is immediately dispatched.
and the screen shows
Under the ' Order #WS10082 Information' section
Status History Current Status: Completed ________________________________ Completed - 2006-02-16 20:18:35.281 Approved - 2006-02-16 10:11:26.437 Created - 2006-02-16 08:29:56.265
Under the Payment Information section
Invoices # [10060] has been added in a new sub-section. Click on the Invoice # to view the invoice in the Accounting Manager.
Under the Shipment Information section
Splitting Preference no longer presents an opportunity to change the preference; chosen method is displayed.
Shipments affords two links:
[Quick-Refund Entire Order] link could be used to immediately reverse a completed order which had been charged to a Credit Card, an Electronics Fund Transfer (EFT), or a Gift Card. Best used before the items leave the Facility. If already shipped, use the [Create Return] link.
[Create Return] brings up a working screen to begin the complex process of bringing products from the customer back into your facility, reversing charges, etc.
The Quick-Ship Shipment document
Even though the 'Shipment' did not follow a complete course through the Facility Manager and elsewhere, paperwork is still needed to confirm stock deletions and track where products have gone.
You can see the highlighted 'Shipments #' link. Click on that number to see the details as shown immediately below.
View Shipment Details
In so much as shipping methods were specified in the ordering process (UPS Ground), this example is somewhat skewed. If you knew the customer was going to retrieve the products personally, you would so indicate in the original order entry process.
You will notice in the document that inventory adjustments and other issues are all presented. You can bore down into any of the highlighted links or select one of the sub-tabs to bring up further details about the order, the products, the customer, etc.
A final link to follow is the 'Generate Shipment Manifest Report' which produces a PDF form to send with the purchaser or to serve as a hard copy for your internal purposes. An example is given below.
The Sales Order process is not complete until the Shipment is generated. This is begun by clicking on the link [New Shipment for Ship Group #].
The following screen in the Facility Manager is sometimes brought up with the Order Number and little else completed in it.
When you generate the Shipment by clicking on 'New Shipment For Ship Group [00001]' link, your screen might not appear as completed as shown above. Before you enter information in the address fields, for example, try clicking on the [Submit] or [Update] link at the bottom of the screen. The system usually will retrieve these addresses from the Sales Order and from the Party Profile to enter the address ID numbers as you see here.
The Status ID wil generally be updated as you go through the following steps. That Status includes Scheduled, Picked, Packed, etc.
If the Order had a desired delivery date, or if you have a good idea what the shipping dates could or should be, here and now is a good time to complete them. Those dates would be the Ready date, the Ship date and the Receive date. The Latest Cancel Date is the last possible moment the order can be canceled before it is committed to the shipping company.
Destination Facility would seldom be used for retail customers. This would be for wholesale customers or established high-volume Business to Business clients.
In this screen you can create a Sales order on the first part, or a Purchase Order on the second part.
For Purchase Order entry, all parties with role "SUPPLIER" are listed in the drop down supplier.
Using the top portion labeled Sales Order, identify the Party placing the order, either with their User Login Id or Party Id. The search tool can be a help.
You have several means to reach the PartyID for the person or company which wishes to place an order.
If specifics about the order are not known, you might prefer to find it through the Party. In that case, select [Lookup Party]. The Party Manager can link you back to previous orders.
Basically, you cannot place an order until the Party is identified. There are several ways to establish the Party ID from within the Order Manager. Since several of those ways take you back through the Party Manager, it might be just as easy to begin with the Party Manager.
Once you click on the [New Order] link, you have begun the order taking process through the Order Manager. The internal, 'behind the scenes' processing of the order is very similar to the Ecommerce order. Unlike the Ecommerce ordering process, the customer will not see all of the screens you have available; only the person taking the order can see all the special offers and the details presented. This is why it is important when taking an order over the phone or completing a transcription from a hard copy or email order, that the processor be alert to special offers or to error messages that might appear.
When a customer first enters the Ecommerce website, they are challenged for a Username and a Password. If they are first time visitors, they are provided an opportunity to create an account. If they have visited before, they are asked for their username and password. All of their entries are automatically logged into the OFBiz databases for your review in OFBiz and for their ordering processes. They never see any part of OFBiz except the Ecommerce interface which includes the content posted from OFBiz to the Ecommerce portion as called up by their preferences.
Order Entry begin with this screen. Using the top portion labeled "Sales Order" identify the Party placing the order, either with their User Login Id (when a ecommerce customer give it to you) or their Party Id. The lookup can help you to search the Id if you have only name, or other details.
On a back office perspective, order entry can be use on a B2B context,
Primary order entry screen is complex, and after one item has been entered, promotional items were added automatically and so more information.
When all items is entered click on [Finalize Order] to give all other order conditions.
In this screen you have a summary of 3 screens for details look at
On this screen it’s possible to choose
If you have defined multiple ship group, in this screen you can choose for each item (and each quantity) with which group it will be ship
There are the same options list for each Ship Group, except for internal and ship Notes
If there are multiple "payment" term, it’s the place to enter them. It’s optional and you can enter as many as you want.
Various payment terms in OFBiz are:
Payment method
How will the customer pay ? Select the radio button to correspond with he payment method preferred by the customer.
Billing information is to completed when credit card or eft payments are not used.
Various payment methods in OFBiz are:
There may be reasons for associating another Party or Group with the order. For example, the person placing the order might be an member of an existing customer group, such as a shopping club, or they might be a purchasing agent for a company and need to be identified with that company.
When you select to identify another group or individual for association, a process will be followed.
Select a Party (use the lookup or auto-completion in field) and after the apply button you have to select which role for this party for this order. Only Existing role associated with the party selected appear.
If there are any discrepancies in the order, this the time to fix them. Click on the appropriate link on Order Confirmation Top Bar to be returned to the applicable screen.
When review is finished and everything meets with the customer’s approval then click on [Create Order].
Congratulations! You have completed all the aspects of entering an order into the system. Be sure the customer receives the Order Confirmation number. You might wish to mail or fax a copy of this screen to the customer for their reference.
Work has just begun behind the scenes for processing the order, however.
The next step will be giving Acceptance and/or Approval for the order which will trigger the processes needed to get the product out the door.
Order entry can come from 2 path, Order management (back office) and eCommerce.
The company’s order entry process is discussed below under the Order Manager Path. You may jump there directly if you wish. Both the ecommerce entry and the Order Manager entry methods are discussed in this section to the point where the order entry is finished and Order Approval is needed before proceeding. It is valuable for you to be familiar with the ecommerce order entry process so that when a customer writes or calls in with a problem from that process you can be understanding and helpful.
Remember that an order can be canceled anytime up to the final confirmation point! Encourage your staff, especially your customer service people, to walk through an on-line order. They should try to see what happens when clicking on links or following paths that they wouldn’t ordinarily follow, just to see what happens! Then, when a customer describes their situation, you can relate to what they are seeing on their screen.
On default main screen eCommerce appl from Apache OFBiz demo site there are multiple widgets
Some comments on the process
The process is or should be as intuitive as possible so the customer is not frustrated or confused. Note the many links provided for shopping, searching for products, finding promotions, and so forth. You might want to add a link to a Customer Service bot where on-line help could answer their immediate questions. The final screen even shows a large [Continue Shopping] link, but the [logout] link is rather inconspicuous.
Also not discussed yet are the links to [Requests] and [Quotes]. Mechanisms are in place to let the customer go from the ecommerce screen to check on a Request or to view a Quote using links on the top menu bar.
Final discussion of the Ecommerce Path
What we show here is the generic look and feel of an on-line ordering system. The applications are there for you to make this reflect your image while maintaining the underlying tools. You do not need to use all of the marketing or redundant convenience processes shown, but it is good to practice running through this system as a shopper to understand how the customer will interface with your store. Let your customer be treated as you would like to be when you shop online.
The Order Reports provide general information about orders in the system.
If your reports look empty it may be required to initialize the warehouse entities in the BI component.
There are referrers, link, totals orders, quantity totals and amount totals. They are grouped by referrer.
There are total Orders, total Items, quantity totals and amount totals. They are grouped by Sales Channel.
There are order, product, promotion and discount. This report is list of All orders.
There are products, prices, stock, sale out quantity and sale out total amount. This report is list of all products, it contains the sales and movements in last 3 months.
This report lists promotions, total orders, percent of total orders, total orders amount, percent of total orders amount and shipping amounts.
This Sales report contains paid and unpaid sales orders.
Net Before Overhead Report is the profit calculation of paid-shipped orders and all the occurred fee excluding the overhead cost. They are grouped by Product Store Id.(Demo data for Net Before Overhead Report have in Product Store Id "B2CStore")
Product Demand Report is the report to show us which product sells good and which product doesn’t sell good or not selling at all in one account as well as for all accounts in last 4 weeks. They are grouped by Product Store Id.(Demo data for Product Demand Report have in Product Store Id "B2CStore")